
PianoSmart Update Procedure
for the DCD1
Yamaha CD Player
The DCD1 PianoSmart upgrade kit is available from Yamaha at no charge. It includes software updates for both the Disklavier Control Unit and the CD Player, and an Operations Manual. You also need to order the extra MIDI cable, that will also be provided free. I strongly suggest acquiring the official kits. I have provided an excerpt from Yamaha's DCD1 PianoSmart Update Procedure. The update procedure presented below is how I explained it to myself.
There are four steps to updating the Yamaha DCD1 CD Player to PianoSmart:
1)
Connect the DCD1 to the
Disklavier Control Unit
2) Update the Disklavier Control Unit
3) Update the DCD1
4) Set the DCD1 Mode to ON
Step 1: Connect the DCD1 to the Disklavier Control Unit
A. Connect the MIDI cables. Make sure the POWER is turned OFF on both the Control Unit and the DCD1 CD Player. Two cables are required to enable 2-way communication between the CD Player the the Disklavier Control Unit. MIDI OUT always connects to MIDI IN.
Note that when connecting the CD Player to the DSR1, there are two sets of MIDI connectors. One pair connects to the old Disklavier Controller marked PIANO, and the other pair, marked MIDI connects to the CD Player. See diagram below.

B. Set the TO HOST switch on the back of the Disklavier Control Unit to MIDI.
C. Set the Piano Type switch on the back of the DCD1 CD Player to match your system. The choices are Dkv, GT10, GT1 and Clavinova.
Step 2: Update the Disklavier Control Unit
A. Choose the proper update disk for your system.
CTRL_V3 is used for the DKC50R,
DKC500RWXG, DKC500RW, DSR1 plus upgraded DKC500R and
DKC500RXG control units with new control boards. Download the zipped file,
DCDV3UD ![]() and expand it
on a floppy disk that has nothing else on it.
and expand it
on a floppy disk that has nothing else on it.
CTRL_V4 is used for updating the DKC55
Mark III Disklavier Control Unit. Download the zipped file DKDV4UD
![]() expand it on a
floppy disk that has nothing else on it.
expand it on a
floppy disk that has nothing else on it.
B. Update the Disklavier Control
Unit. Press the Power/On button while depressing the Play
button. Insert the the correct CTRL ![]() disk and follow the prompts in the window, pressing ENTER or Yes
as prompted. Do NOT eject disk or unplug system while system is being
updated! until the message COMPLETE Turn OFF, Turn ON again! appears, then
turn off.
disk and follow the prompts in the window, pressing ENTER or Yes
as prompted. Do NOT eject disk or unplug system while system is being
updated! until the message COMPLETE Turn OFF, Turn ON again! appears, then
turn off.

Step 3: Update the DCD1 CD Player
Download the zipped file
DCD1UD ![]() and expand it on a floppy disk that has nothing else on it. This has two
programs CDP V1.10 and DSP V1.25 that need to be updated for the
CD Player. Because the DCD1 CD Player does not have a floppy drive, the Disklavier
Control Unit is used by attaching that second MIDI cable. Clever!
and expand it on a floppy disk that has nothing else on it. This has two
programs CDP V1.10 and DSP V1.25 that need to be updated for the
CD Player. Because the DCD1 CD Player does not have a floppy drive, the Disklavier
Control Unit is used by attaching that second MIDI cable. Clever!
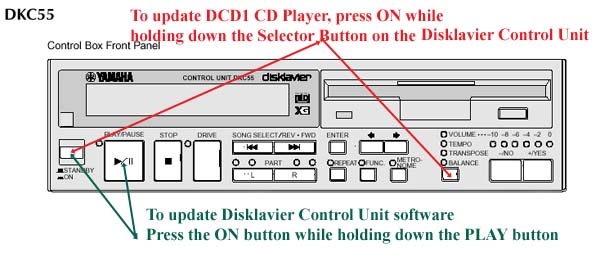
A. Turn on the Disklavier Control Unit by pressing the Power/On button while depressing the SELECTOR button. Refer to the illustrations above marked in Red. The SELECTOR button controls Volume, Tempo, Transpose and Balance. When the DCD1 Mode setting screen appears, press the -> until the cursor is next to "DCD1 Firmware Updater" and press ENTER.
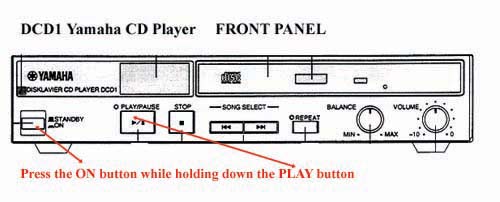
B. Turn on the DCD1 by pressing the ON button while holding down the PLAY button. Refer to the diagram below.
C. Press ENTER on the Disklavier
Control Unit, twice, then insert the DCD1UP
![]() disk into the floppy drive. There
are two programs to update. Press YES at each prompt - SURE? After
both programs have finished writing, the COMPLETE message displays. At this
time, turn off the power for BOTH the Disklavier Control Unit AND the DCD1.
disk into the floppy drive. There
are two programs to update. Press YES at each prompt - SURE? After
both programs have finished writing, the COMPLETE message displays. At this
time, turn off the power for BOTH the Disklavier Control Unit AND the DCD1.
A. With the power off, turn on the Disklavier Control Unit by pressing the Power/On button while holding down the SELECTOR button for Volume, Tempo, Transpose and Balance functions like you did above. Refer to the red lines in Step 3A above.
B. Press the YES button so that "DCD1 mode = ON" appears in the display. Turn off the control unit. Update procedure for both the Disklavier Control Unit and DCD1 is completed!