Connecting a MIDI Piano to a Computer
Why
Connect a MIDI Piano to a computer?
Hardware
Considerations
To Host
Port
Software
Considerations
Trouble
Shooting a Computer Installation
Why Connect a MIDI Piano to a Computer?
There are several reasons you might want to connect your MIDI piano to a computer:
![]() Need to bypass the floppy
disk drive. This is particularly useful if the floppy drive is broken,
or only proprietary files like early PianoDisc or Yamaha ESEQ files will play on
your disk drive, and you would like to play standard MIDI files. All
Disklaviers will play MIDI files from a computer.
Need to bypass the floppy
disk drive. This is particularly useful if the floppy drive is broken,
or only proprietary files like early PianoDisc or Yamaha ESEQ files will play on
your disk drive, and you would like to play standard MIDI files. All
Disklaviers will play MIDI files from a computer.
![]() Create Playlists.
Instead of changing the floppy disk or the CD every dozen songs or so, you can
copy your MIDI files to the hard drive on a computer and create longer play
lists. Play songs in any order you want or organize your music by category,
i.e., jazz, hymns, Irish tunes, etc. A simple Jukebox software program
will do this for standard MIDI files, like the vanBasco Karaoke Player in
the software downloads on this site. Sequencer software will also do this,
like Jazz++ also to be
found here. You would first need to convert any propriety file formats to
standard MIDI files first. The dkvutil software has an
ESEQ2MID program that runs in Windows. Make sure that you have duplicate
directories of the files you want to convert though so you don't mess up your
originals!
Create Playlists.
Instead of changing the floppy disk or the CD every dozen songs or so, you can
copy your MIDI files to the hard drive on a computer and create longer play
lists. Play songs in any order you want or organize your music by category,
i.e., jazz, hymns, Irish tunes, etc. A simple Jukebox software program
will do this for standard MIDI files, like the vanBasco Karaoke Player in
the software downloads on this site. Sequencer software will also do this,
like Jazz++ also to be
found here. You would first need to convert any propriety file formats to
standard MIDI files first. The dkvutil software has an
ESEQ2MID program that runs in Windows. Make sure that you have duplicate
directories of the files you want to convert though so you don't mess up your
originals!
![]() Use educational
software. There are programs available to help you learn to play the
piano, or provide Ensemble sounds to accompany you while playing. Check
out the Band-in-a-Box and Home Concert software on the Music
Software page.
Use educational
software. There are programs available to help you learn to play the
piano, or provide Ensemble sounds to accompany you while playing. Check
out the Band-in-a-Box and Home Concert software on the Music
Software page.
![]() Record a song from your keyboard directly into an
editing program. Although any file you create by recording to a floppy
disk or memory disk can also be edited, some find it more convenient to record
directly into their Sequencing Software. This may require the use of an
interrupt (IRQ) on an IBM compatible PC. Consult the documentation for
your computer's soundcard.
Record a song from your keyboard directly into an
editing program. Although any file you create by recording to a floppy
disk or memory disk can also be edited, some find it more convenient to record
directly into their Sequencing Software. This may require the use of an
interrupt (IRQ) on an IBM compatible PC. Consult the documentation for
your computer's soundcard.
![]() Control other MIDI instruments. With
appropriate software, you could use your MIDI Player to control the sounds
coming from another electronic keyboard, drum machine, etc.
Control other MIDI instruments. With
appropriate software, you could use your MIDI Player to control the sounds
coming from another electronic keyboard, drum machine, etc.
Connecting a MIDI Player to a computer requires BOTH consideration of the hardware and the software.
The first thing to consider is the computer. You can use either a laptop or desktop model; a Mac or an IBM compatible PC. The most important decision will be from which port on the computer will you be making the MIDI connections. There are USB ports, parallel ports (often used for the printer), serial ports, and the joystick port on the soundcard. Many new laptops today do not have a serial port.
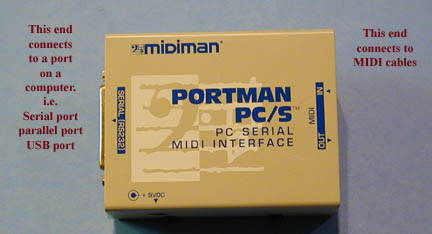
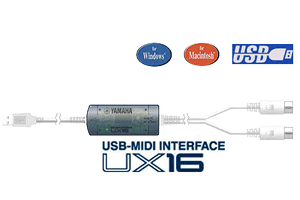
The next piece of hardware you need is a MIDI Interface unless you are using a Yamaha instrument equipped with a TO HOST Port described later. This device has one end that connects to a computer, so the type of MIDI interface is determined by what port you have decided to connect to on your computer. You can buy parallel, serial and USB MIDI interfaces or a pigtail cable that attaches to the Joystick port on the soundcard. Only IBM computers need soundcards as Macs already have that capability. The other end of the MIDI interface has MIDI connector ports; a MIDI IN, at least one MIDI OUT, and a MIDI THRU.
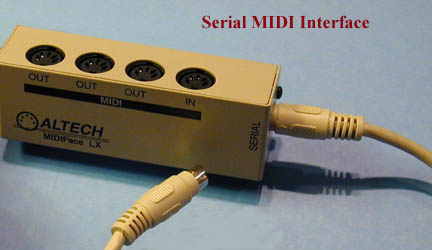

MIDI cables are attached at one end to the MIDI Interface, and the other end attaches to the piano's MIDI ports. MIDI cables are inexpensive and come in various lengths. They are one-way communication only, so you would need two cables if you were going to record music from your piano into your computer as well as play music from the hard drive into your piano. The MIDI OUT on the interface would connect to the MIDI IN on the piano, and the MIDI IN on the interface would connect to the MIDI OUT on the piano.


The TO HOST Port is a Connection Option found on Yamaha Instruments.

Disklaviers starting with the MarkIIXG models come equipped with a TO HOST port that eliminates the need for a MIDI Interface and MIDI cables. The quality of the MIDI signal is identical to using the standard MIDI connections on the control box. To connect to a Macintosh, all that is necessary is a standard serial cable (mini DIN 8-pin). To connect to an IBM PC computer, you would use a standard serial cable with one end a mini DIN 8-pin connected to the To HOST port, and the other end either a D-SUB 9-pin or a D-SUB 25-pin to connect to the serial port on the computer. Yamaha sells a cable (part number Yamaha CCIBM) for connecting PCs to any Yamaha product equipped with a To-Host connector port.

When using the TO HOST port, you must also use the CBX driver for your particular operating system when using am IBM PC. These can be downloaded for free from the Yamaha website under Support and Downloads at http://www.yamaha.com/. There is also one included on this website for Windows 98 called cbx.exe
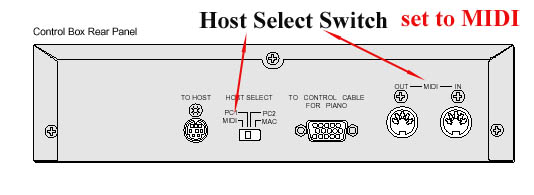
The HOST SELECT SWITCH must be set to the appropriate position!
The HOST SELECT Switch appears on all models of Yamaha instruments equipped with a TO HOST port and it is absolutely necessary to set it to the proper position. If you are using the TO HOST port, the set the switch to your computer type; MAC or PC2. Only if you were using a NEC computer from Japan would you set it to PC1. If you are connecting MIDI cables to the standard MIDI ports, set the switch to MIDI.
The IRQ assignment for PCs only needs to be considered if MIDI IN is used for Recording data directly into the soundcard port on the computer. Make sure there are no conflicts and that the proper drivers are installed for MIDI on your soundcard. Remember, when using the CBX cable to install the CBX driver!
When using Sequencer software, make sure you tell your computer where to look to find the MIDI inputs and outputs. Usually this is done by selecting from the Options menu in the software. Select the soundcard, or the MIDI interface, or whatever you are using for both MIDI inputs and outputs. Also, make sure the MIDI options on the volume controls are turned up and that the Mute button is not checked.
Troubleshooting a computer connection to a MIDI Player
Why Don’t I Hear Anything? One of the most frustrating scenarios is correctly connecting the MIDI cables, MIDI interfaces, installing the appropriate software, etc. and nothing happens! The simple answer is that somewhere in all that maze, the appropriate connection is not turned on. Here are some things to check.
![]() Make sure the
Host
Select switch on the back of the Disklavier Control Box is set correctly for
those models that have this feature. If using a MIDI interface connected
to the MIDI ports, choose MIDI. If using the To Host port, set the switch
to PC2 for a PC computer, or Mac for a Macintosh computer.
Make sure the
Host
Select switch on the back of the Disklavier Control Box is set correctly for
those models that have this feature. If using a MIDI interface connected
to the MIDI ports, choose MIDI. If using the To Host port, set the switch
to PC2 for a PC computer, or Mac for a Macintosh computer.
![]() Check the
MIDI cable connections. MIDI Out from one device always connects the
other end of the MIDI cable to MIDI In on the other
device.
Check the
MIDI cable connections. MIDI Out from one device always connects the
other end of the MIDI cable to MIDI In on the other
device.
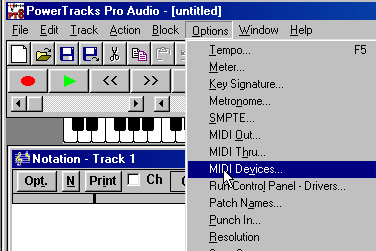
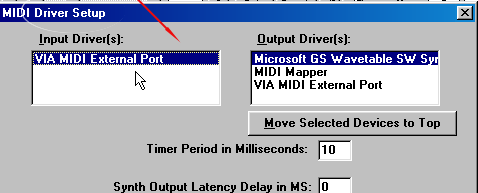
![]() There are
usually several MIDI drivers installed on your computer - the soundcard MIDI
Player, the Windows Media Player, the MIDI interface, etc. and you need to
tell the program you are using which driver to use for MIDI IN and MIDI
OUT. You select MIDI Devices from the Options pull-down menu
and choose the appropriate drivers. If you are using a Yamaha CBX cable
connected to the To Host port, make sure you have chosen the CBX
driver.
There are
usually several MIDI drivers installed on your computer - the soundcard MIDI
Player, the Windows Media Player, the MIDI interface, etc. and you need to
tell the program you are using which driver to use for MIDI IN and MIDI
OUT. You select MIDI Devices from the Options pull-down menu
and choose the appropriate drivers. If you are using a Yamaha CBX cable
connected to the To Host port, make sure you have chosen the CBX
driver.
![]() Your Windows
MIDI Mapper properties may need checked. Access these by choosing
Control Panel, then Multimedia, the Properties to see what drivers
are installed.
Your Windows
MIDI Mapper properties may need checked. Access these by choosing
Control Panel, then Multimedia, the Properties to see what drivers
are installed.
![]() Check that
your soundcard has the MIDI turned on and the Mute box is not
checked! Go to Control Panel, then System, and check the Sound, Video and Game
controllers section. Make sure Full Duplex is set “on”. Some
soundcards come with a Mixer. Make sure the sliders in the Volume Controls
are turned up and the appropriate Mute boxes are NOT checked. Also in the
Control Panel (Windows operating systems), click the icon for Multimedia
Properties or Sound and Audio devices depending upon the operating system, and
make sure the appropriate drivers are present.
Check that
your soundcard has the MIDI turned on and the Mute box is not
checked! Go to Control Panel, then System, and check the Sound, Video and Game
controllers section. Make sure Full Duplex is set “on”. Some
soundcards come with a Mixer. Make sure the sliders in the Volume Controls
are turned up and the appropriate Mute boxes are NOT checked. Also in the
Control Panel (Windows operating systems), click the icon for Multimedia
Properties or Sound and Audio devices depending upon the operating system, and
make sure the appropriate drivers are present.
![]() On the Midi
Player Piano end of the connection, check to make sure that the appropriate
settings are enabled for receiving and sending MIDI information. For the
Yamaha Disklavier, set the Piano Part to Rcv Ch=01 then set the Piano
Receive Channel to Prg(All). You may also want to set L=01 and
R=Prg. You may also want to set the Delay In=ON.
On the Midi
Player Piano end of the connection, check to make sure that the appropriate
settings are enabled for receiving and sending MIDI information. For the
Yamaha Disklavier, set the Piano Part to Rcv Ch=01 then set the Piano
Receive Channel to Prg(All). You may also want to set L=01 and
R=Prg. You may also want to set the Delay In=ON.
![]() If you are
sending data from your keyboard to your computer (recording) thru a MIDI
cable instead of the TO HOST Port, be sure to set MIDI Out=KBD Out.
Select the MIDI Out Channel so that Keyboard and pedal data is where you want
them. Half pedal data is usually sent on Channel 3 and Keyboard data and
on/off pedal data usually on Channel 1.
If you are
sending data from your keyboard to your computer (recording) thru a MIDI
cable instead of the TO HOST Port, be sure to set MIDI Out=KBD Out.
Select the MIDI Out Channel so that Keyboard and pedal data is where you want
them. Half pedal data is usually sent on Channel 3 and Keyboard data and
on/off pedal data usually on Channel 1.